Party Star Card Making: A Creative Birthday Project
Crafting personalized greetings has never been more accessible, yet the desire for unique, handmade items remains stronger than ever. Party Star Card Making offers a perfect intersection of simplicity and visual impact, allowing creators to produce professional-looking birthday cards with minimal effort. This design is particularly effective because it relies on layering rather than complex stitching or intricate die-cutting skills. By simply cutting parts from colored paper of your choice and assembling them, you can create a tactile, eye-catching piece that stands out in any mailbox.
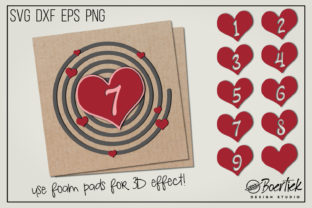
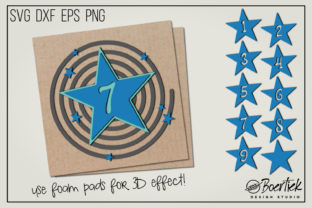
The core appeal lies in its versatility. Whether you are a hobbyist looking for a weekend project or a small business owner needing high-volume custom goods, this approach provides a scalable solution. The process is straightforward: cut all components from your selected paper, arrange them on top of each other, and utilize 3D foam pads to achieve a stunning three-dimensional effect. This technique adds depth and texture, transforming flat paper into a dynamic centerpiece that invites the recipient to touch and explore the card.
Customization for Every Age Group
One of the most practical features of this design is its adaptability for various ages. The kit includes different star numbers ranging from 1 to 9 years old, ensuring that the card feels tailored to the specific milestone being celebrated. For a first birthday, the number "1" takes center stage, while a ninth birthday gets the attention of the digit "9." This level of detail shows care and thoughtfulness, which are crucial elements in meaningful gift-giving.
However, the design goes beyond standard numbering. It also includes a blank star. This element opens up a world of possibilities for older children, teenagers, or adults where a specific age isn't the primary focus. You can use the blank star to write a name, a special message, or even a year like "2024" or "50th." This flexibility ensures that the same base design serves multiple demographics without requiring a complete redesign of the project files.
Technical Specifications and File Compatibility
For digital crafters and machine users, the utility of this project extends far beyond the physical instructions. The package includes a comprehensive suite of file formats: SVG, DXF, EPS, and PNG with a transparent background. Each format serves a specific purpose within the crafting ecosystem, ensuring that users can work regardless of their preferred software.
- SVG Files: These are the industry standard for modern cutting machines. They can be imported into Cricut Design Space, Silhouette Studio Designer Edition, ScanNCut, Sure Cuts a Lot, Make the Cut, and many other vector-based programs. SVGs allow for precise scaling and color separation, making them ideal for multi-layered projects.
- DXF Files: Designed for broader compatibility, the DXF file works seamlessly with Silhouette Studio Basic Edition. This is a significant benefit for users who prefer not to upgrade to paid versions of design software but still want access to high-quality cutting paths.
- EPS and PNG: The EPS format supports vector editing in professional graphic design tools, while the PNG with a transparent background is perfect for quick previews, digital mockups, or printing without unwanted white boxes.
It is important to note that these files do not include a background. This intentional design choice gives the creator full control over the card's foundation. You can choose a solid color cardstock, a patterned paper, or even a textured material to complement the stars. This lack of a preset background prevents the final product from looking generic and allows the layers to pop against whatever backdrop you select.
Creative Applications and Style Variations
The beauty of Party Star Card Making lies in how different materials can alter the final aesthetic. While standard construction paper works well for a child-friendly look, experimenting with metallic foils, glitter cardstock, or kraft paper can elevate the design for a more sophisticated audience. Imagine using silver foil stars on a deep navy blue card for a teen's birthday, or pastel matte stars on a cream background for a baby shower.
Beyond birthdays, this concept can be adapted for other celebratory contexts. The blank star allows for customization that fits graduation parties, anniversary celebrations, or even "just because" gestures. Educators might find this useful for classroom activities where students create cards for classmates, learning about layering and spatial awareness while building social connections. Freelance designers can use the base design as a template for client gifts, adding their own branding or logo to the blank star area.
When organizing your workspace, consistency is key. To ensure your results remain clear and effective, try to maintain a consistent color palette across the layers. Using shades of the same color family can create a harmonious gradient effect when viewed from the front, while contrasting colors can make the individual stars stand out sharply. The 3D foam pads play a critical role here; they not only provide height but also cast subtle shadows that enhance the definition of each layer.
Practical Steps for Success
To get the best results from this project, preparation is essential. Start by selecting your paper weights. If the paper is too thin, the layers may buckle under the weight of the foam pads. If it is too thick, the cutting machine might struggle, or the assembly could become difficult. A medium-weight cardstock (around 65lb to 80lb) often strikes the right balance between durability and ease of handling.
- Cutting: Ensure your blades are sharp. Dull blades can tear delicate star points, ruining the crisp look of the design. Run a test cut if you are using a new material type.
- Assembly: Apply the 3D foam pads to the back of the top layers before placing them on the base. Press firmly to secure the bond. Start with the largest star at the bottom and work your way up to the smallest or the numbered star.
- Finishing Touches: Once assembled, consider adding a handwritten note inside the card. The contrast between the structured, geometric exterior and the personal, handwritten interior creates a memorable emotional connection.
This project demonstrates that high-quality design does not require expensive equipment or years of training. By leveraging digital files and simple manual techniques, anyone can produce art that feels bespoke. Whether you are creating a single card for a loved one or a batch for a community event, the Party Star Card Making method provides a reliable framework for success.
As you explore this design, remember that the goal is to inspire creativity, not just follow instructions. Use the included files as a starting point. Mix and match colors, experiment with different textures, and let the 3D aspect guide your composition. The result will be a card that is not just a piece of paper, but a tangible expression of celebration and care.